
This document provides a detailed guide for using Visual Studio Code (VSCode) to build and execute ROS 2 projects efficiently with C++ and Python. It covers a range of topics, including initializing VSCode, remote development over SSH, development using Docker, sourcing ROS dependencies, and building with Colcon. The document also delves into specific techniques for working in C++ and Python within the ROS 2 environment, offering valuable insights and tips to enhance the development process.
Do you want a simple way to use ROS via Docker and get to solving hard robotics problem quickly without sacrificing the ability to develop your own custom hardware or integrate the latest AI Models? PickNik offers MoveIt™ Pro to advance your robotics platform quickly.
Table of Contents
- Initialization of Visual Studio Code
- Remote development over SSH
- Development on Docker
- Sourcing your ROS Dependencies
- How to build with Colcon
- How to build with CMake
- Working in C++
- Working in Python
- Tips
- Additional extensions
- Additional Resources
Initialization of Visual Studio Code
For this guide, it is presumed that Visual Studio Code has already been installed on your system without additional extensions. In an Ubuntu environment, the extensions are commonly stored in the following directory:
~/.vscode
Upon launching VSCode, install the Microsoft ROS extension, followed by a restart of the editor.

This extension will facilitate the installation of requisite dependencies such as Microsoft C/C++ and Microsoft Python extensions.

Install the C/C++ Extension Pack, which provides Intellisense and C++ file navigation. This will install the CMake extension, too.
Remote development over SSH
VSCode can be used to develop remotely over SSH. You must install an extension called Microsoft Remote SSH. This extension will also add a button on the left toolbar to display all available Docker containers.
Open the command palette and type: “Remote-SSH: Connect to Host…”.
Development on Docker
VSCode can be used to develop on Docker. You must install an extension called Microsoft Dev Containers, which you can use to connect to running containers. With this extension, you can install your local VSCode extensions into the container in one click.
You should also install the extension called Microsoft Docker, which allows you to work with containers and images.
For more information, see the VSCode document Attach to a running container.
Sourcing your ROS Dependencies
When you execute or debug a file in your project, it may fail to find its runtime dependencies and throw an error in the Debug Console. There are different solutions for this issue.
Solution 1 - for local development
You can source your ROS 2 workspace in the same Debug Console and try again.
source install/setup.bash
Solution 2 - for local development
You can modify the user .bashrc to source your ROS 2 workspace whenever you attach VSCode to the container.
Solution 3 - for docker containers
If you do not want to run a command each time you start a debug session and you cannot modify the file .bashrc, here is a more versatile approach.
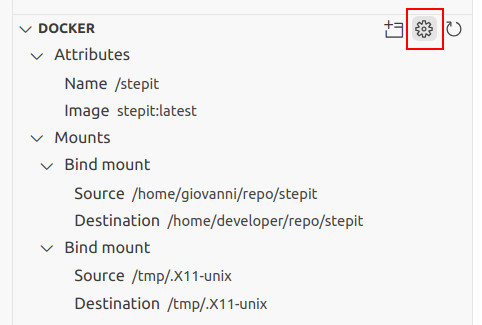
You want to execute a source command every time VSCode opens the container. The VSCode DevContainer extension allows you to edit the JSON container configuration file, providing a field for this purpose. Open the configuration file by clicking on the highlighted cog.
Add the following field to modify the .bashrc each time you connect VSCode to the container. TAG is a unique ID to verify if the command has already been added.
"postAttachCommand": "grep -qF 'TAG' $HOME/.bashrc || echo 'source project-workspace/install/setup.bash # TAG' >> $HOME/.bashrc"
The container configuration file is usually stored somewhere inside this folder:
$HOME/.config/Code/User/globalStorage/ms-vscode-remote.remote-containers/
How to build with Colcon
To run the colcon command from VSCode, you need to create the file tasks.json within the .vscode folder and populate it with the following content:
{
  "version": "2.0.0",
  "tasks": [
    {
      "label": "colcon: build (debug)",
      "type": "shell",
      "command": [
        "source /opt/ros/humble/setup.bash;",
        "colcon build",
        "--symlink-install",
        "--event-handlers console_cohesion+",
        "--base-paths workspace-path",
        "--cmake-args -DCMAKE_BUILD_TYPE=Debug"
      ]
    },
    {
      "label": "colcon: clean",
      "type": "shell",
      "command": ["cd project-workspace;", "rm -rf build/ install/ log/;"]
    },
    {
      "label": "colcon: test",
      "type": "shell",
      "command": [
        "cd project-workspace;",
        "source /opt/ros/humble/setup.bash;",
        "source install/setup.bash;",
        "colcon test",
        "--packages-select <package-name>",
        "--event-handlers console_direct+;"
      ]
    }
  ]
}
To build a package, this may also work.
{
  "version": "2.0.0",
  "tasks": [
    {
      "label": "colcon: build (debug)",
      "type": "colcon",
      "group": "build",
      "args": [
        "build",
        "--symlink-install",
        "--event-handlers console_cohesion+",
        "--base-paths project-workspace",
        "--cmake-args -DCMAKE_BUILD_TYPE=Debug"
      ]
    }
  ]
}
Modify the file according to your ROS 2 distribution and project location.
Choose “Terminal → Run build task…” from the menu to build your project. The system will automatically locate and initiate the build task specified in the aforementioned tasks.json file. Alternatively, use the keyboard shortcut:
Ctrl + Shift + B
Using the same approach, you can also execute any ROS 2 launch files.
How to build with CMake
Building your code with CMake from within the IDE is also possible. Here is a sample configuration to add to the file tasks.json.
{
   "version": "2.0.0",
   "tasks": [
       {
           "label": "CMake Configure",
           "type": "shell",
           "command": "cmake",
           "args": [
               "-S", ".",
               "-B", "build",
               "-DCMAKE_BUILD_TYPE=Release",
               "other options..."
           ],
           "options": {
               "env": {
                   "C_INCLUDE_PATH": "path to C include files...",
                   "CPLUS_INCLUDE_PATH": "path to C++ include files...",
                   "LIBRARY_PATH": "path to libraries...",
                   "CMAKE_PREFIX_PATH": "path to CMake modules...",
                   "LD_LIBRARY_PATH": "path to libraries...",
                   "PATH": "path to executables, including compiler and cmake..."
               }
           },
           "group": {
               "kind": "build",
               "isDefault": true
           }
       },
       {
           "label": "CMake Build",
           "type": "shell",
           "command": "cmake",
           "args": [
               "--build", "build"
           ],
           "options": {
               "env": {
                   "C_INCLUDE_PATH": "path to C include files...",
                   "CPLUS_INCLUDE_PATH": "path to C++ include files...",
                   "LIBRARY_PATH": "path to libraries...",
                   "CMAKE_PREFIX_PATH": "path to CMake modules...",
                   "LD_LIBRARY_PATH": "path to libraries...",
                   "PATH": "path to executables, including compiler and cmake..."
               }
               }
           },
           "group": "build",
           "problemMatcher": [
               "$gcc"
           ],
           "dependsOn": ["CMake Configure"]
       }
   ]
}
Working in C++
If you open an existing ROS 2 project that contains C++ source code, you may observe that VSCode generates a .vscode folder containing two configuration files:
c_cpp_properties.json
settings.json
If c_cpp_properties.json is not created, you can create a new one by opening the command palette and typing “C++: Edit Configurations (UI).” Update it to match roughly the following content:
{
  "configurations": [
    {
      "browse": {
        "databaseFilename": "${default}",
        "limitSymbolsToIncludedHeaders": false
      },
      "includePath": [
        "/opt/ros/humble/include/**",
        "/usr/include/**",
        "add here your project include files"
      ],
      "name": "ROS",
      "intelliSenseMode": "gcc-x64",
      "compilerPath": "/usr/bin/gcc",
      "cStandard": "gnu11",
      "cppStandard": "c++17"
    }
  ],
  "version": 4
}
⚠️Warning
Do not implicitly add all include files of your install folder, for example, by adding "${workspaceFolder}/**" to your include path. This can seriously confuse Intellisense and yourself when developing.
Add a subfolder if needed:
${workspaceFolder}/build/package
There are two additional parameters worth mentioning.
"configurationProvider": "ms-vscode.cmake-tools",
"compileCommands": "${workspaceFolder}/build/compile_commands.json"
If you can build your application with Colcon before opening VSCode, you can use the generated file compile_commands.json to feed Intellisense. This configuration overrides the includePath parameter. It is more precise but requires a build folder, which is not always the case.
Navigation and Shortcuts
You may conveniently toggle between .cpp and .hpp files using the following keyboard shortcut:
Alt + O
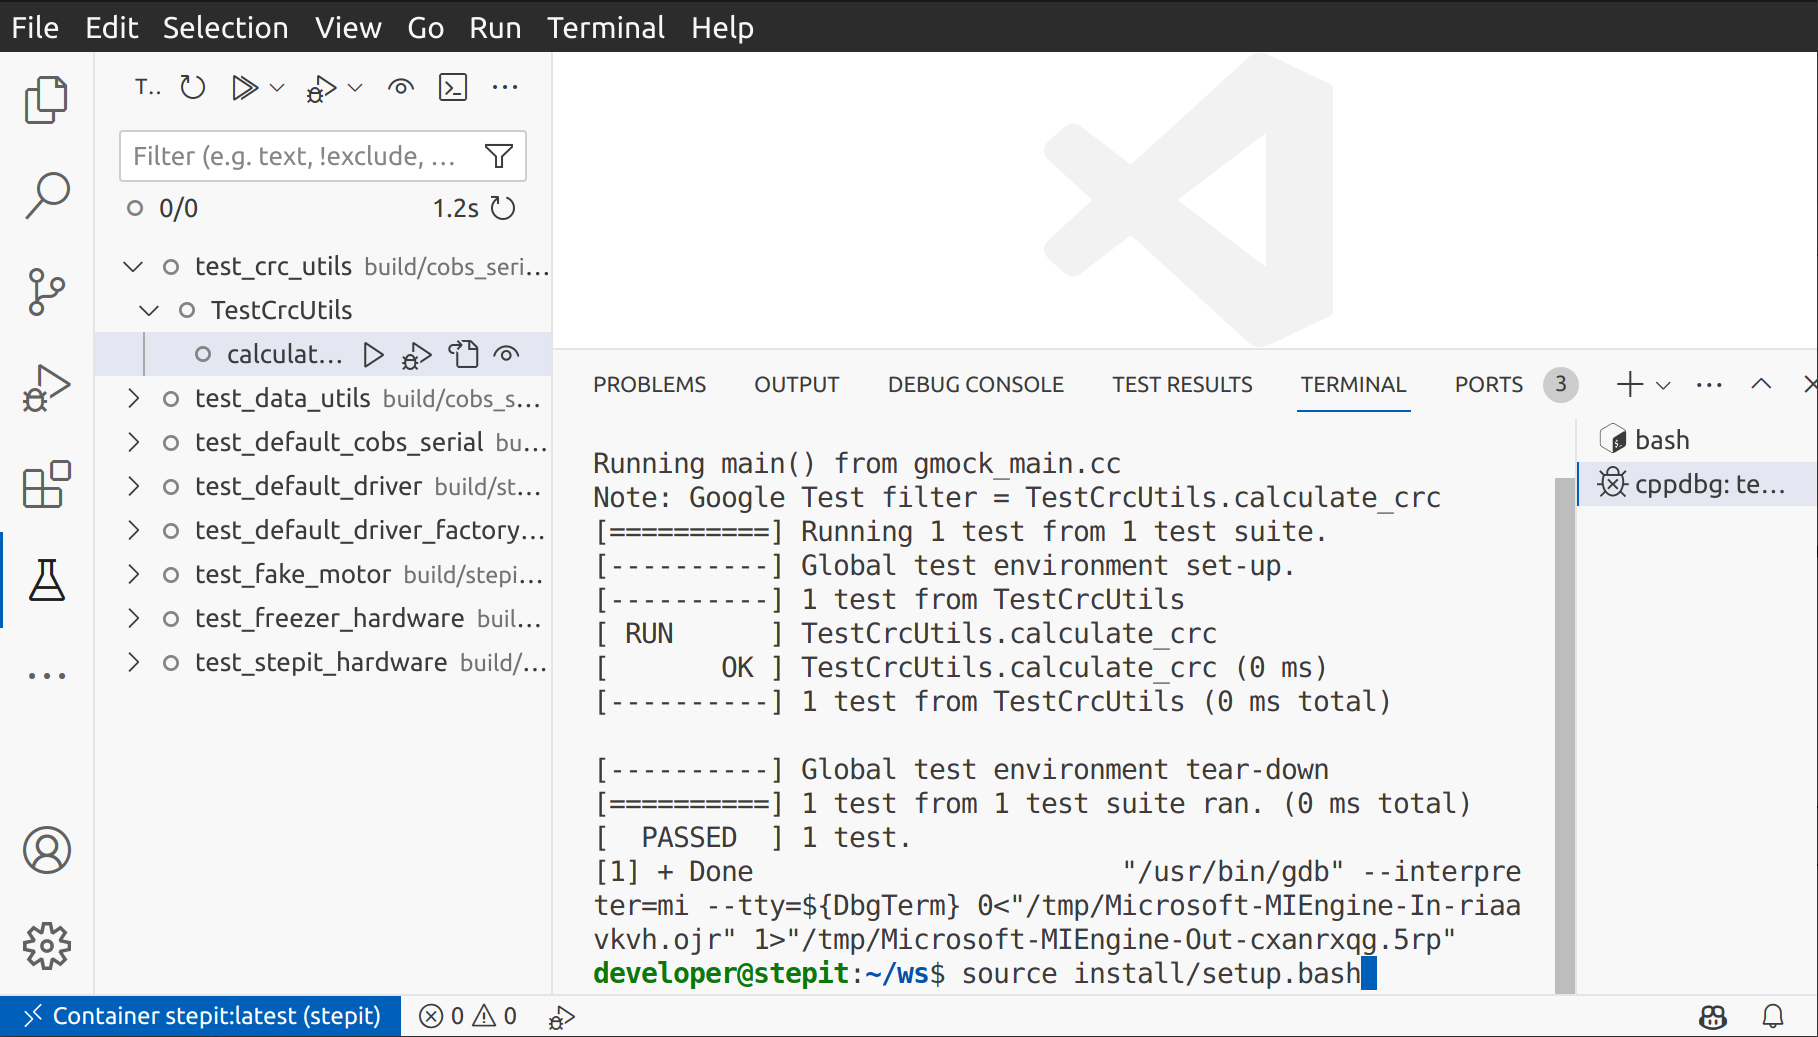
Debugging tests
Another helpful extension is C++ TestMate, which lets you launch and debug GTests directly within VSCode.
Please note that for this extension to work correctly, you may need to source your ROS repository before starting up VSCode.
To debug your test, create a launch.json file inside your .vscode directory. The file is automatically created for you when you debug your first test.
{
  "version": "0.2.0",
  "configurations": [
    {
      "name": "GDP: launch",
      "type": "cppdbg",
      "request": "launch",
      "program": "enter program name, for example, ${workspaceFolder}/../build/path_to_executable",
      "args": [],
      "stopAtEntry": false,
      "cwd": "${fileDirname}",
      "environment": [],
      "externalConsole": false,
      "MIMode": "gdb",
      "preLaunchTask": "add your build task here. e.g. colcon: build",
      "setupCommands": [
        {
          "description": "Enable pretty-printing for gdb",
          "text": "-enable-pretty-printing",
          "ignoreFailures": true
        },
        {
          "description": "Set Disassembly Flavor to Intel",
          "text": "-gdb-set disassembly-flavor intel",
          "ignoreFailures": true
        }
      ]
    }
  ]
}
Working in Python
More information is available here: https://code.visualstudio.com/docs/python/python-tutorial
Intellisense
When you open an existing ROS 2 Python project, IntelliSense does not find your ROS 2 Python modules or local package modules. To solve the issue, create a file settings.json with content matching roughly the following:
{
  "python.autoComplete.extraPaths": [
    "/opt/ros/humble/lib/python3.10/site-packages",
    "/opt/ros/humble/local/lib/python3.10/dist-packages",
    "/my_project/build/package1",
    "/my_project/build/package2"
  ],
  "python.analysis.extraPaths": [
    "/opt/ros/humble/lib/python3.10/site-packages",
    "/opt/ros/humble/local/lib/python3.10/dist-packages",
    "/my_project/build/package1",
    "/my_project/build/package2"
  ]
}
All Python dependencies are stored in the environment variable PYTHONPATH. Unfortunately, VSCode does not use it. To get the list of all libraries, source your project and type the following bash command
IFS=:; for path in $PYTHONPATH; do echo "\"$path\","; done
Sorting imports
To sort imports in a Python module, open the command palette and type “Organize imports”. You can also use the following shortcut:
Shift + Alt + O
Debugging Python files
To debug a normal Python file, you must create a launch.json file inside your .vscode directory.
{
  "version": "0.2.0",
  "configurations": [
    {
      "name": "Python: Current File",
      "type": "python",
      "request": "launch",
      "program": "${file}",
      "args": ["--arg1", "value"],
      "console": "integratedTerminal",
      "justMyCode": true
    }
  ]
}
To debug a ROS 2 Python launch file, open a command palette and type “ROS: Run a ROS launch file (roslaunch)” to add a new launch configuration to your launch.json. You can also add it manually.
{
  "version": "0.2.0",
  "configurations": [
    {
      "name": "ROS: Launch",
      "type": "ros",
      "request": "launch",
      "target": "/absolute-path/launch-file.py"
    }
  ]
}
The ROS 2 extension allows you to debug a running node as well.
{
  "version": "0.2.0",
  "configurations": [
    {
      "name": "ROS: Attach",
      "type": "ros",
      "request": "attach"
    }
  ]
}
Remember to add the following additional argument to your node in the launch file:
my_node = launch_ros.actions.Node(
    ...
    prefix=["gdbserver :3000"],
)
Following is a more complex solution that requires you to modify the Python file. Add this code to the end of the launch file to convert it to a normal Python file:
def main():
    ls = launch.LaunchService()
    ld = generate_launch_description()
    ls.include_launch_description(ld)
    return ls.run()


if __name__ == '__main__':
    main()
Using an “opaque function” allows you to debug the values of launch parameters. However, with the previous change, you’ll need to modify the launch file, as demonstrated in the following example.
def launch_setup(context, *args, **kwargs):
    my_param = LaunchConfiguration("param_name")


def generate_launch_description():
    return LaunchDescription(
        [
            DeclareLaunchArgument(
                "param_name",
                default_value="param_value",
                description=("param_description"),
            ),
            OpaqueFunction(function=launch_setup),
        ]
    )
In VSCode, we can add a breakpoint and display the content of this variable with a watch:
my_param.perform(context)
Discover and execute tests
Test discovery in VSCode does not work perfectly, and sometimes it does not find your tests automatically.
You can add them manually by appending the following lines to your settings.json:
  "python.testing.pytestEnabled": true,
  "python.testing.unittestEnabled": false,
  "python.testing.cwd": "${workspaceFolder}/path-to-test-folder/",
  "python.testing.pytestPath": "/usr/bin/pytest-3"
Your tests should now be available under the testing view on the left activity bar.
If you do not need to debug your tests, you can always run colcon test as described previously.
Tips
Highlight current tab
Add the following to your configuration file settings.json:
"workbench.colorCustomizations": {
      "tab.activeBorder": "#ffffff",
      "tab.activeBackground": "#373737"
  }
Additional extensions
General
- Bookmarks: Mark lines of codes and later jump to them.
- CodeSnap: Extension to take screenshots of your code.
- Debug Visualizer: Extension for visualizing data structures while debugging. Like the watch view, but with rich visualizations of the watched value.
- Error Lens: Extension to better display errors in the code.
- Favorites: Mark resources (files or folders, local and remote) as favorites, so they can be easily accessed.
- Git History: View the git log, and file history and compare branches or commits.
- Markdown All in One: Extension for Markdown advanced editing. It adds a document outline, automatic table of contents, etc.
- Microsoft Live Preview: Hosts a local server in your workspace to preview your web pages.
- Microsoft Live Share: Extension to share your editor for real-time collaborative development.
- Protobuf (Protocol Buffers): Extension to add Protobuf support powered by the Pbkit language server.
- Shortcut Menu Bar: Extension to add some helpful toolbar buttons like go back/forward buttons, switch between headers and cpp files, and more.
- Task Explorer: Extension to display and execute tasks displayed on the explorer panel. Remember to configure the extension to enable the tasks button on the VSCode left activity panel.
- UMLet: Draw UML diagrams inside VSCode
Python
- Astral Software Ruff: Support for the Ruff linter.
- Debug Launcher: Start debugging without having to define any tasks or launch configurations, even from the terminal.
- Microsoft Black Formatter: An automatic Python code formatted.
- Microsoft Jupyter: Extension to edit and run Jupyter notebooks.
- Microsoft Pylint: Support for the Pylint linter. This extension helps identify missing methods and variables.
- Microsoft Pylance: This is a powerful tool that enhances the Python development experience in Visual Studio Code by providing tools for code analysis, error checking, code navigation, and code completion.
Additional Resources
For additional information about ROS 2 and VSCode, you may refer to the following tutorials:
MoveIt Pro is PickNik Robotics’ commercial robotics software platform that extends the capabilities of the open-source MoveIt project. Designed for unstructured environments, MoveIt Pro provides powerful tools for motion planning, grasping, perception, and behavior sequencing. With pre-built robot behaviors and a modular runtime architecture, MoveIt Pro significantly reduces engineering effort and time-to-deployment. Its hardware-agnostic design supports a wide range of commercial and custom robotic arms, making it ideal for scalable automation across space, manufacturing, and logistics sectors.


